A friend of mine runs a small candle brand out of her apartment in Istanbul. Last year she paid a photographer 800 euros for a half-day shoot. Got 40 usable images. Did the math: 20 euros per photo, plus two weeks of waiting, plus a reshoot request that never happened because the budget was gone.
This January she sent me a folder of 60 product images she’d made herself. I genuinely could not tell which ones were AI and which were from the paid shoot. The Midjourney ones were better, actually. Cleaner backgrounds, more consistent lighting, and she’d made them in a single afternoon.
The difference between her first attempts six months earlier and these wasn’t the tool. Same tool. It was learning to prompt like a photographer instead of a customer. That shift is the whole thing. Once you understand what photographers actually describe when they brief an assistant, Midjourney product images stop looking like AI experiments and start looking like studio work.
This guide is that shift, explained step by step.
What You’ll Learn
- The five-part prompt structure that separates usable Midjourney product images from amateur output
- Which photography terms change the output dramatically and which do nothing
- Ready-to-use prompts for studio shots, lifestyle images, and flat lays
- How to use –ar, –s, and –no without reading any documentation
- What Midjourney genuinely cannot do for product photography and the workaround that actually works
- How to build one reusable brand template that runs across an entire product catalog
What You Need
- Midjourney Basic or Standard. Basic is $10/month. Standard is $30. For a real product catalog, Standard makes more sense because complex product prompts burn through fast hours quickly.
- Discord or midjourney.com. The browser interface at midjourney.com is easier for beginners. Discord gives you slightly more control over outputs.
- A clear product description written before you open anything. Material, color, finish, size, distinguishing details. Write this down first. The prompt is only as specific as the product description you put into it.
- Canva, Photoshop, or Photoroom for the last 15%. Midjourney handles the heavy lifting. Resizing, adding real text, removing minor artifacts — that happens elsewhere.
One limitation worth knowing before we start. Midjourney generates something that looks like your product. It cannot reproduce your actual product with your exact label and your exact logo reliably. If you need that, the workflow is different: photograph or render your real product, then composite it onto an AI-generated background using Photoroom or Claid.ai. That combo works very well. But it is a separate process from what this guide covers.
Step 1: Prompt Like a Photographer, Not a Customer
When someone books a studio shoot, the photographer doesn’t hear “take a nice photo of this.” They hear something like: “We need this on a white cyclorama, three-point lighting, Hasselblad, 85mm, eye level, shadows soft and clean.” That’s a brief. That’s what Midjourney needs too.
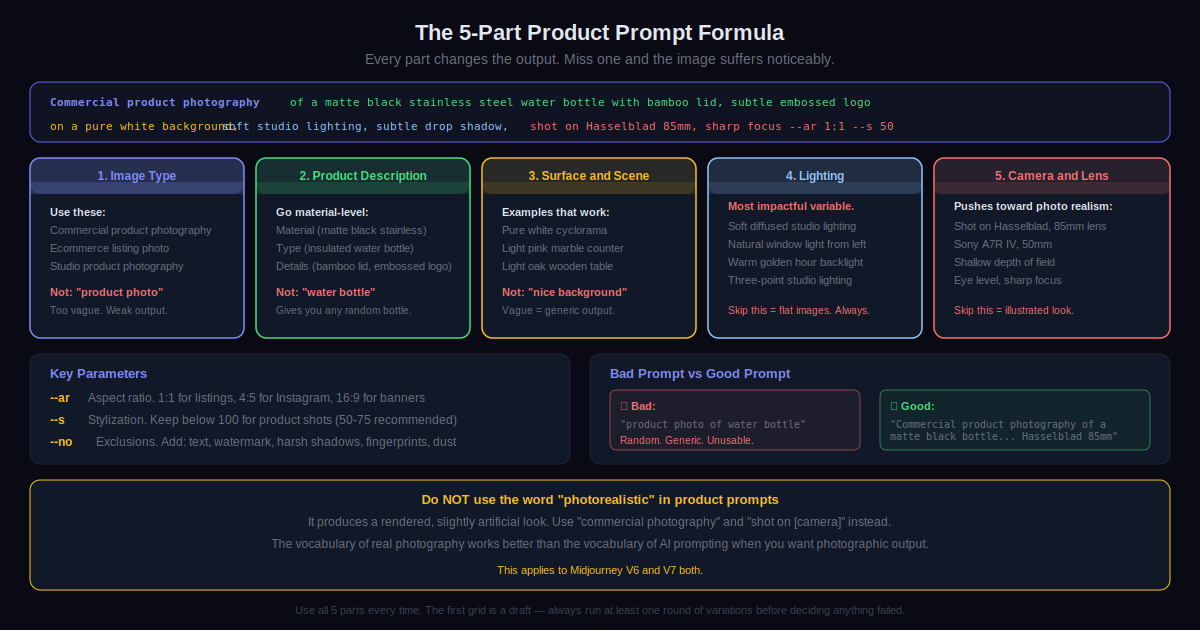
Every good product prompt has five parts. Miss one and the output suffers noticeably.
Image type. “Commercial product photography” performs better than “product photo.” Other options: “ecommerce listing photo,” “studio product photography,” “lifestyle product shot.”
Product description. Go material-level. Not “water bottle.” “Matte black stainless steel insulated water bottle with a bamboo screw lid, subtle embossed logo on the lower third, 750ml.” Every detail you add pulls the image toward your actual product.
Surface and scene. What is the product sitting on or in front of? “Pure white cyclorama background,” “light oak wooden table,” “pink marble counter,” “wet slate surface.” Vague backgrounds produce generic-looking images.
Lighting. The single most impactful variable and the one most beginners skip. “Soft diffused studio lighting,” “natural window light from the left,” “warm golden hour backlight,” “three-point studio lighting with soft fill.” Skipping this gives you flat images every time.
Camera and lens. “Shot on Hasselblad, 85mm” or “Sony A7R IV, 50mm, shallow depth of field.” These push Midjourney toward photographic output rather than illustrated or rendered output.
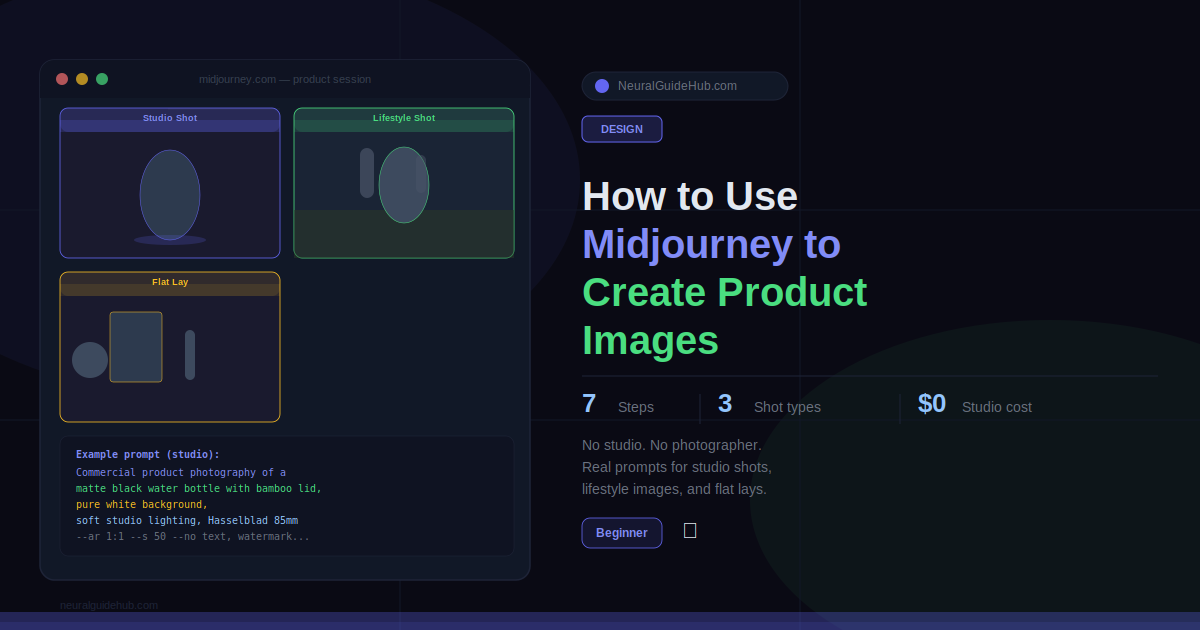
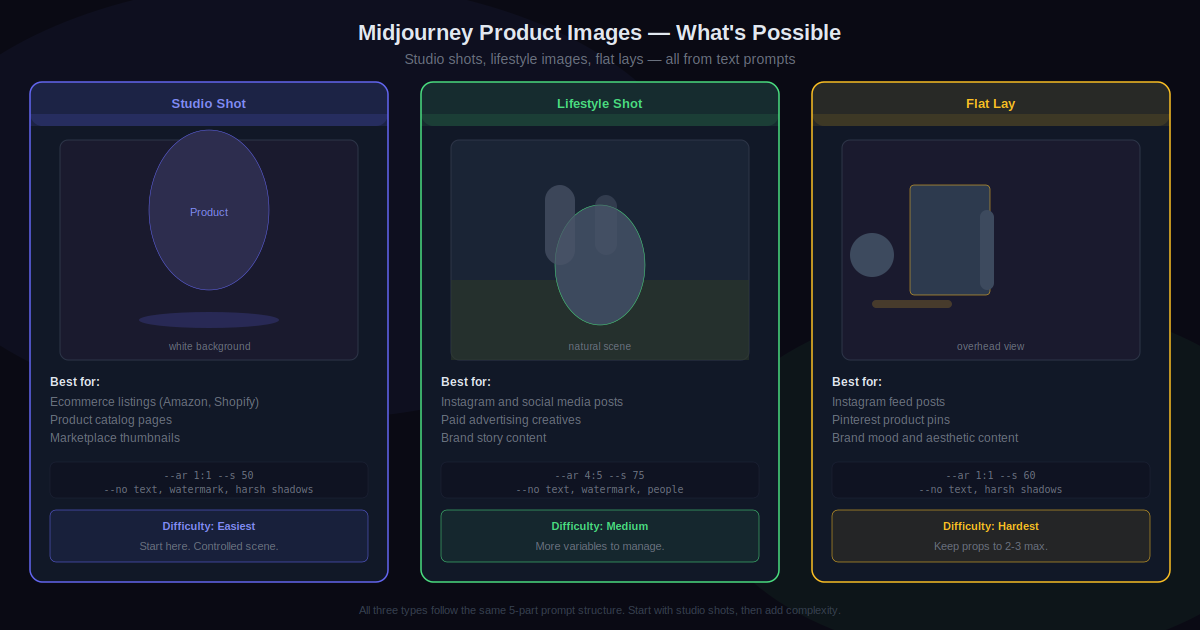
Step 2: Studio Shot
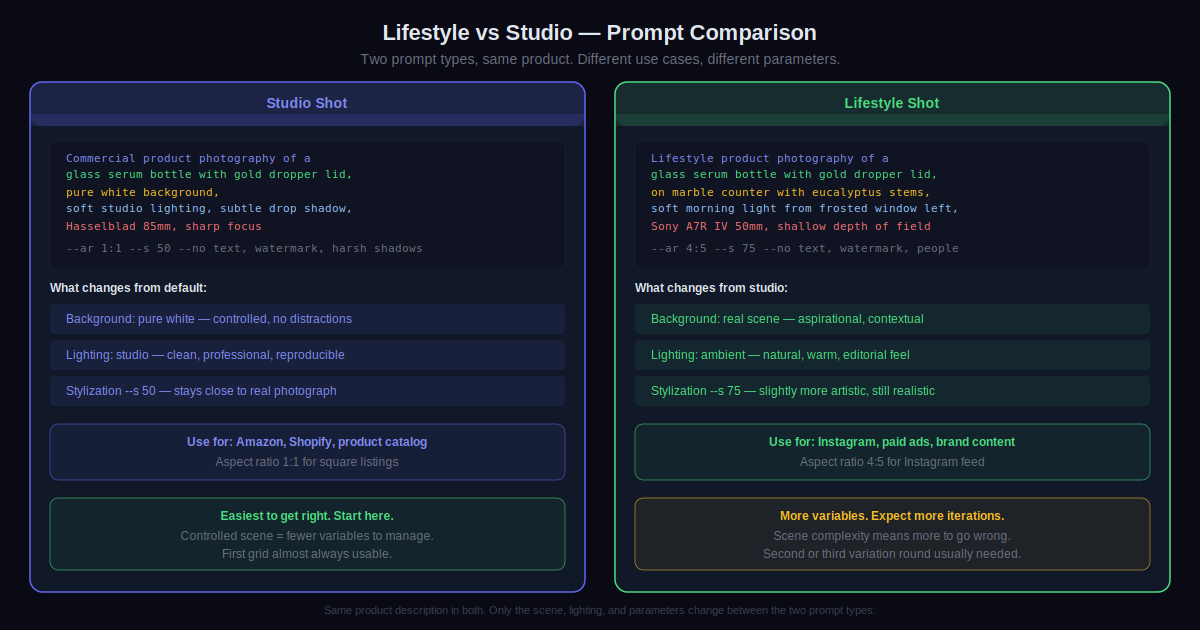
Start here. White background, controlled lighting, one product. Most useful image type for product listings. Easiest to get right because there is no complex scene to manage.
Go to midjourney.com or Discord, type /imagine, then paste this with your details filled in:
Commercial product photography of a [your product description], pure white background, soft studio lighting with subtle shadow beneath, shot on Hasselblad, 85mm lens, sharp focus, high resolution, ecommerce listing style --ar 1:1 --s 50
Actual example: Commercial product photography of a matte black stainless steel insulated water bottle with bamboo screw lid, subtle embossed logo on the lower third, pure white background, soft studio lighting, subtle drop shadow, Hasselblad 85mm, sharp focus, high resolution ecommerce listing --ar 1:1 --s 50
--ar 1:1 sets aspect ratio. Square works for most listings. Use --ar 4:5 for Instagram, --ar 16:9 for banners.
--s 50 keeps stylization low so Midjourney stays close to a photograph rather than getting artistic. For product work keep this below 100 almost always.
Midjourney returns four options. Click U1 through U4 to upscale the best one. Then click V1 through V4 on the upscaled image to generate four more variations close to it. Keep iterating until you find something worth taking into Canva or Photoshop.
Step 3: Lifestyle Shot
Studio shots handle listings. Lifestyle shots handle social and ads. Products in real environments convert better on Instagram than white background images and Midjourney is genuinely good at generating the kind of aspirational scenes that would cost a real budget to build.
Two things change from the studio prompt: the background becomes a real scene, and the lighting becomes ambient rather than studio.
Lifestyle product photography of a [product], [specific scene and surroundings], [ambient lighting description], shot on Sony A7R IV, 35mm lens, shallow depth of field, [color tone], editorial product photography style --ar 4:5 --s 75
Skincare example: Lifestyle product photography of a glass serum bottle with gold dropper lid, on a light marble bathroom counter surrounded by dried eucalyptus stems and a folded white towel, soft morning light from a frosted window to the left, Sony A7R IV, 50mm, shallow depth of field, warm neutral tones, luxury skincare editorial --ar 4:5 --s 75
Notice --s 75 here instead of 50. A touch more stylization works for lifestyle work because you want the scene to feel aspirational.
Step 4: Use –no on Every Single Prompt
Small addition. Significant difference.
--no tells Midjourney what to exclude. For product images, add this every time without exception:
--no text, watermark, harsh shadows, fingerprints, dust, reflections, people
Without it, Midjourney occasionally adds fake text to product labels, puts fingerprints on shiny surfaces, or creates unnatural harsh shadows. These are defaults the model falls into. --no pushes them away in five seconds and saves cleanup time after every generation.
One more counterintuitive thing while we’re here: do not use the word “photorealistic” in product prompts. It sounds like it should help. It makes outputs look digitally rendered instead of photographed. “Studio product photography” and “shot on [camera model]” get you closer to actual photographic output than “photorealistic” does, every time.
Step 5: Flat Lay
Top-down shots of products arranged with complementary props. Good for Instagram and Pinterest. Also one of the harder prompt types to get right because Midjourney can be inconsistent with spatial arrangements of multiple objects.
Keep scenes simple. Two or three props maximum. Being too specific about exact placement usually produces worse results than leaving the arrangement loose.
Flat lay product photography, overhead shot looking directly down, [main product] as the central focus, loosely surrounded by [2-3 simple complementary props], on [surface], soft natural light from above, clean minimal styling, product catalog editorial --ar 1:1 --s 60 --no text, watermark, harsh shadows
Example: Flat lay product photography, overhead shot, brown kraft paper journal as the central focus, loosely surrounded by a vintage fountain pen and a small succulent, on light linen fabric, soft diffused natural light, minimal stationery brand editorial --ar 1:1 --s 60 --no text, watermark, harsh shadows
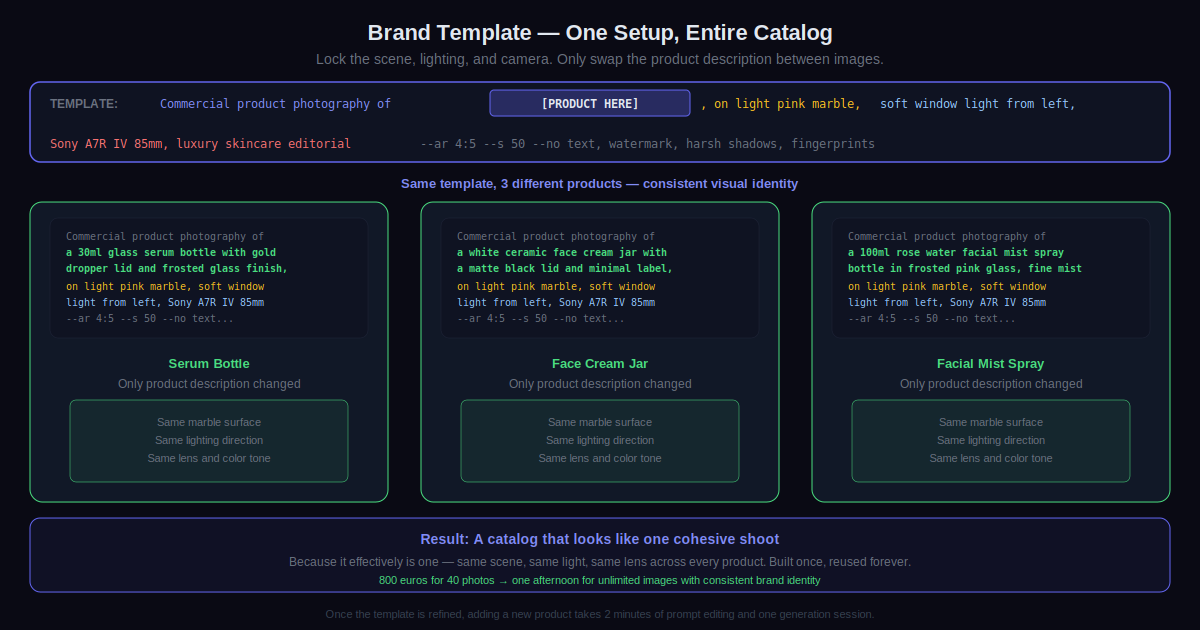
Step 6: Build a Brand Template
Shooting a full product catalog means you cannot rebuild the prompt from zero every time. Define your scene, lighting, and camera style once. Then only change the product description between images. Everything else stays identical.
This is how a real photography studio maintains visual consistency across a product line. Same surface. Same lighting direction. Same color temperature. Same lens feel. With Midjourney you get the same result by locking the non-product parts of the prompt.
Example template for a skincare brand:
Commercial product photography of [PRODUCT HERE], on a light pink marble surface, soft window light from the left with warm undertone, Sony A7R IV, 85mm, shallow depth of field, luxury skincare editorial, clean minimal aesthetic --ar 4:5 --s 50 --no text, watermark, harsh shadows, fingerprints
Run this across 20 products. The catalog looks like one cohesive shoot because it effectively is one.
Step 7: Finish It Outside Midjourney
Midjourney gets you to about 85% of a finished image. The remaining 15% happens in a separate tool. This is just how the workflow works.
What needs finishing after export:
- Resizing to exact pixel dimensions for your specific platform
- Adding real product text, your actual logo, any pricing overlays
- Minor color correction or brightness adjustment
- Background removal if you’re compositing the image into a different scene
- Cleaning up any artifacts or odd details around product edges
Canva handles most of this for free. Photoshop handles all of it with more precision. Photoroom is specifically built for product images and includes AI background removal that works particularly well with Midjourney outputs.
Pro Tips
- Never quit after the first grid. The first four images tell you if the direction is right. Nothing more. Click V1 or V2 on the best one, generate four more variations from that, and keep going. Almost every good product image comes from the second or third round of variations, not the first. Quitting at the first grid is the most common reason people decide the tool doesn’t work.
- Change one variable per iteration. Lighting not working? Change only the lighting description and regenerate. Surface looks wrong? Change only the surface. Swapping everything at once makes it impossible to know what fixed the problem. One variable at a time, every iteration.
- Use a reference image with –iw. Add a reference image URL to your prompt followed by
--iw 0.5to--iw 2. Higher number means stronger style influence from the reference. Useful for matching a specific visual aesthetic or replicating a lighting setup you’ve seen work well for your product category. - Describe the photo as if it already exists. “Commercial product photography of a [product] on marble” works better than “create a mockup of my product on marble.” Frame it as documentation of a real scene, not a request to build one. The output shifts noticeably toward photographic realism with this framing.
- Test each prompt across three aspect ratios before finalizing. A composition that looks great at 1:1 often crops badly at 4:5 or 16:9. If you need images for multiple platforms, generate at each ratio before locking in the prompt. The results are sometimes dramatically different from each other.
- Save good prompt phrases in a document. When a lighting description produces something genuinely great, save that exact phrase. Build a personal library of surface descriptions, camera setups, and lighting terms that work for your product type. After a few weeks you stop starting from scratch every session.
Common Mistakes to Avoid
- Vague product descriptions. “Bottle” gives you a random bottle that looks nothing like yours. “Matte black stainless steel insulated water bottle with bamboo lid, subtle embossed logo, 750ml” gives Midjourney something specific to work with. More descriptors means output that looks more like your actual product. This single change matters more than any other prompt adjustment.
- Using “photorealistic” in the prompt. It tends to produce a rendered, slightly artificial look. “Commercial photography” and “shot on [camera]” produce images that look actually photographed. The vocabulary of real photography works better than the vocabulary of AI prompting when you want a photographic result.
- Skipping –no. Fake text on product labels, fingerprints on shiny surfaces, harsh unnatural shadows. These are common Midjourney defaults. Adding
--no text, watermark, harsh shadows, fingerprintstakes five seconds and prevents the most common issues that need manual cleanup afterward. - Expecting exact product reproduction. Midjourney generates something that looks like your product. If you need your exact label at exact placement with exact colors, photograph the product first and composite it onto an AI background. Spending hours trying to get Midjourney to nail your specific packaging design is time wasted on something the tool was not built to do.
- Treating the first grid as the final result. It isn’t. It’s a draft. Run variations. The people who consistently get great product images out of Midjourney iterate quickly. They’re not perfectionists on the first try. They generate fast, identify what’s closest, push variations from there, and land on something usable in four or five rounds rather than one.
Next Steps
Pick one product. Write out a description of it before you open Midjourney. Material, color, finish, distinguishing features. Take two minutes on this. It is the most important part of the whole process.
Then build a studio shot prompt using the five-part structure from Step 1. Generate it. Hit V1 on the best result. Do that three times.
After the studio shot is working, try a lifestyle shot for the same product. Same product description, completely different scene. Compare the two. That contrast teaches you more about how Midjourney interprets your words than reading any guide.
Once you have prompts that produce results you would actually use, build the brand template. That is the point where this stops being experimentation. One template, one consistent visual language, an entire catalog generated without starting from scratch each time. That is when the tool becomes genuinely useful rather than occasionally impressive.
My friend with the candle brand is now doing this for three other small businesses in her building. She charges less than a photographer, turns around images in 24 hours, and the clients cannot tell the difference. Neither could I.